
If you look long enough into the autoencoder, it looks back at you.
The Autoencoder is a fun deep learning model to look into. Its goal is simple: given an input image, we would like to have the same output image.
It’s sort of an identity function for deep learning models, but it is composed of two parts: an encoder and decoder, with the encoder translating the images to a latent space representation and the encoder translating that back to a regular images that we can view.
We are going to make a simple autoencoder with Clojure MXNet for handwritten digits using the MNIST dataset.
The Dataset
We first load up the training data into an iterator that will allow us to cycle through all the images.
(def train-data (mx-io/mnist-iter {:image (str data-dir "train-images-idx3-ubyte")
                                   :label (str data-dir "train-labels-idx1-ubyte")
                                   :input-shape [784]
                                   :flat true
                                   :batch-size batch-size
                                   :shuffle true}))
Notice there the the input shape is 784. We are purposely flattening out our 28x28 image of a number to just be a one dimensional flat array. The reason is so that we can use a simpler model for the autoencoder.
We also load up the corresponding test data.
(def test-data (mx-io/mnist-iter {:image (str data-dir "t10k-images-idx3-ubyte")
                                  :label (str data-dir "t10k-labels-idx1-ubyte")
                                  :input-shape [784]
                                  :batch-size batch-size
                                  :flat true
                                  :shuffle true}))
When we are working with deep learning models we keep the training and the test data separate. When we train the model, we won’t use the test data. That way we can evaluate it later on the unseen test data.
The Model
Now we need to define the layers of the model. We know we are going to have an input and an output. The input will be the array that represents the image of the digit and the output will also be an array which is reconstruction of that image.
(def input (sym/variable "input"))
(def output (sym/variable "input_"))

(defn get-symbol []
  (as-> input data
    ;; encode
    (sym/fully-connected "encode1" {:data data :num-hidden 100})
    (sym/activation "sigmoid1" {:data data :act-type "sigmoid"})

    ;; encode
    (sym/fully-connected "encode2" {:data data :num-hidden 50})
    (sym/activation "sigmoid2" {:data data :act-type "sigmoid"})

    ;; decode
    (sym/fully-connected "decode1" {:data data :num-hidden 50})
    (sym/activation "sigmoid3" {:data data :act-type "sigmoid"})

    ;; decode
    (sym/fully-connected "decode2" {:data data :num-hidden 100})
    (sym/activation "sigmoid4" {:data data :act-type "sigmoid"})

    ;;output
    (sym/fully-connected "result" {:data data :num-hidden 784})
    (sym/activation "sigmoid5" {:data data :act-type "sigmoid"})

    (sym/linear-regression-output {:data data :label output})))
From the model above we can see the input (image) being passed through simple layers of encoder to its latent representation, and then boosted back up from the decoder back into an output (image). It goes through the pleasingly symmetric transformation of:
784 (image) -> 100 -> 50 -> 50 -> 100 -> 784 (output)
We can now construct the full model with the module api from clojure-mxnet.
(def data-desc (first (mx-io/provide-data-desc train-data)))

(def model (-> (m/module (get-symbol) {:data-names ["input"] :label-names ["input_"]})
               (m/bind {:data-shapes [(assoc data-desc :name "input")]
                        :label-shapes [(assoc data-desc :name "input_")]})
               (m/init-params {:initializer  (initializer/uniform 1)})
               (m/init-optimizer {:optimizer (optimizer/adam {:learning-rage 0.001})})))
Notice that when we are binding the data-shapes and label-shapes we are using only the data from our handwritten digit dataset, (the images), and not the labels. This will ensure that as it trains it will seek to recreate the input image for the output image.
Before Training
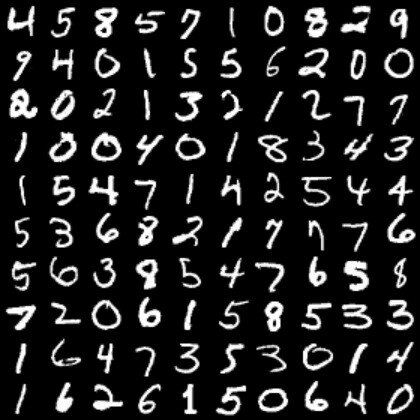
Before we start our training, let’s get a baseline of what the original images look like and what the output of the untrained model is.
To look at the original images we can take the first training batch of 100 images and visualize them. Since we are initially using the flattened [784] image representation. We need to reshape it to the 28x28 image that we can recognize.
(def my-batch (mx-io/next train-data))
(def images (mx-io/batch-data my-batch))
(ndarray/shape (ndarray/reshape (first images) [100 1 28 28]))
(viz/im-sav {:title "originals" :output-path "results/" :x (ndarray/reshape (first images) [100 1 28 28])})
We can also do the same visualization with the test batch of data images by putting them into the predict-batch and using our model.
;;; before training
 (def my-test-batch (mx-io/next test-data))
 (def test-images (mx-io/batch-data my-test-batch))
 (def preds (m/predict-batch model {:data test-images} ))
 (viz/im-sav {:title "before-training-preds" :output-path "results/" :x (ndarray/reshape (first preds) [100 1 28 28])})

They are not anything close to recognizable as numbers.
Training
The next step is to train the model on the data. We set up a training function to step through all the batches of data.
(def my-metric (eval-metric/mse))

(defn train [num-epochs]
  (doseq [epoch-num (range 0 num-epochs)]
    (println "starting epoch " epoch-num)
    (mx-io/do-batches
     train-data
     (fn [batch]
       (-> model
           (m/forward {:data (mx-io/batch-data batch) :label (mx-io/batch-data batch)})
           (m/update-metric my-metric (mx-io/batch-data batch))
           (m/backward)
           (m/update))))
    (println "result for epoch " epoch-num " is " (eval-metric/get-and-reset my-metric))))
For each batch of 100 images it is doing the following:
- Run the forward pass of the model with both the data and label being the image
- Update the accuracy of the model with the
mse(mean squared error metric) - Do the backward computation
- Update the model according to the optimizer and the forward/backward computation.
Let’s train it for 3 epochs.
starting epoch  0
result for epoch  0  is  [mse 0.06460866]
starting epoch  1
result for epoch  1  is  [mse 0.033874355]
starting epoch  2
result for epoch  2  is  [mse 0.027255038]
After training
We can check the test images again and see if they look better.
;;; after training
(def my-test-batch (mx-io/next test-data))
(def test-images (mx-io/batch-data my-test-batch))
(def preds (m/predict-batch model {:data test-images} ))
(viz/im-sav {:title "after-training-preds" :output-path "results/" :x (ndarray/reshape (first preds) [100 1 28 28])})
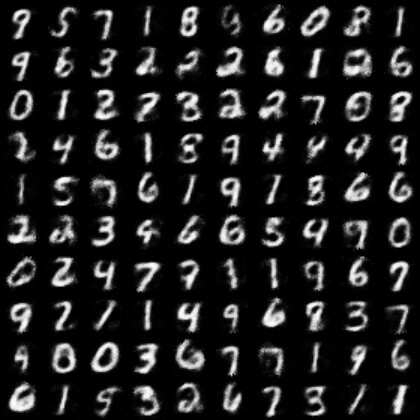
Much improved! They definitely look like numbers.
Wrap up
We’ve made a simple autoencoder that can take images of digits and compress them down to a latent space representation the can later be decoded into the same image.
If you want to check out the full code for this example, you can find it here.
Stay tuned. We’ll take this example and build on it in future posts.